“The thing”: An analysis of a weird classic Mac OS bug [Part 1]

A long time ago, I read this article (in French) written by an ex-Apple support technician. It documented a weird bug that occurred in some versions of “classic” Mac OS (pre-Mac OS X) and had some interesting consequences. The author nicknamed the bug “The thing”, in reference to the 1982 film of the same name.

For some reason (probably because of the weirdness of the bug), I remembered this article for all these years, and I recently decided to investigate now that I know a bit more how computers work ;)

First, let’s set up the scene: Mac OS 8.5 running in the SheepShaver emulator. You will notice that I’m using the French version of Mac OS, and there is a reason for that. I’ll try to provide translations where needed.
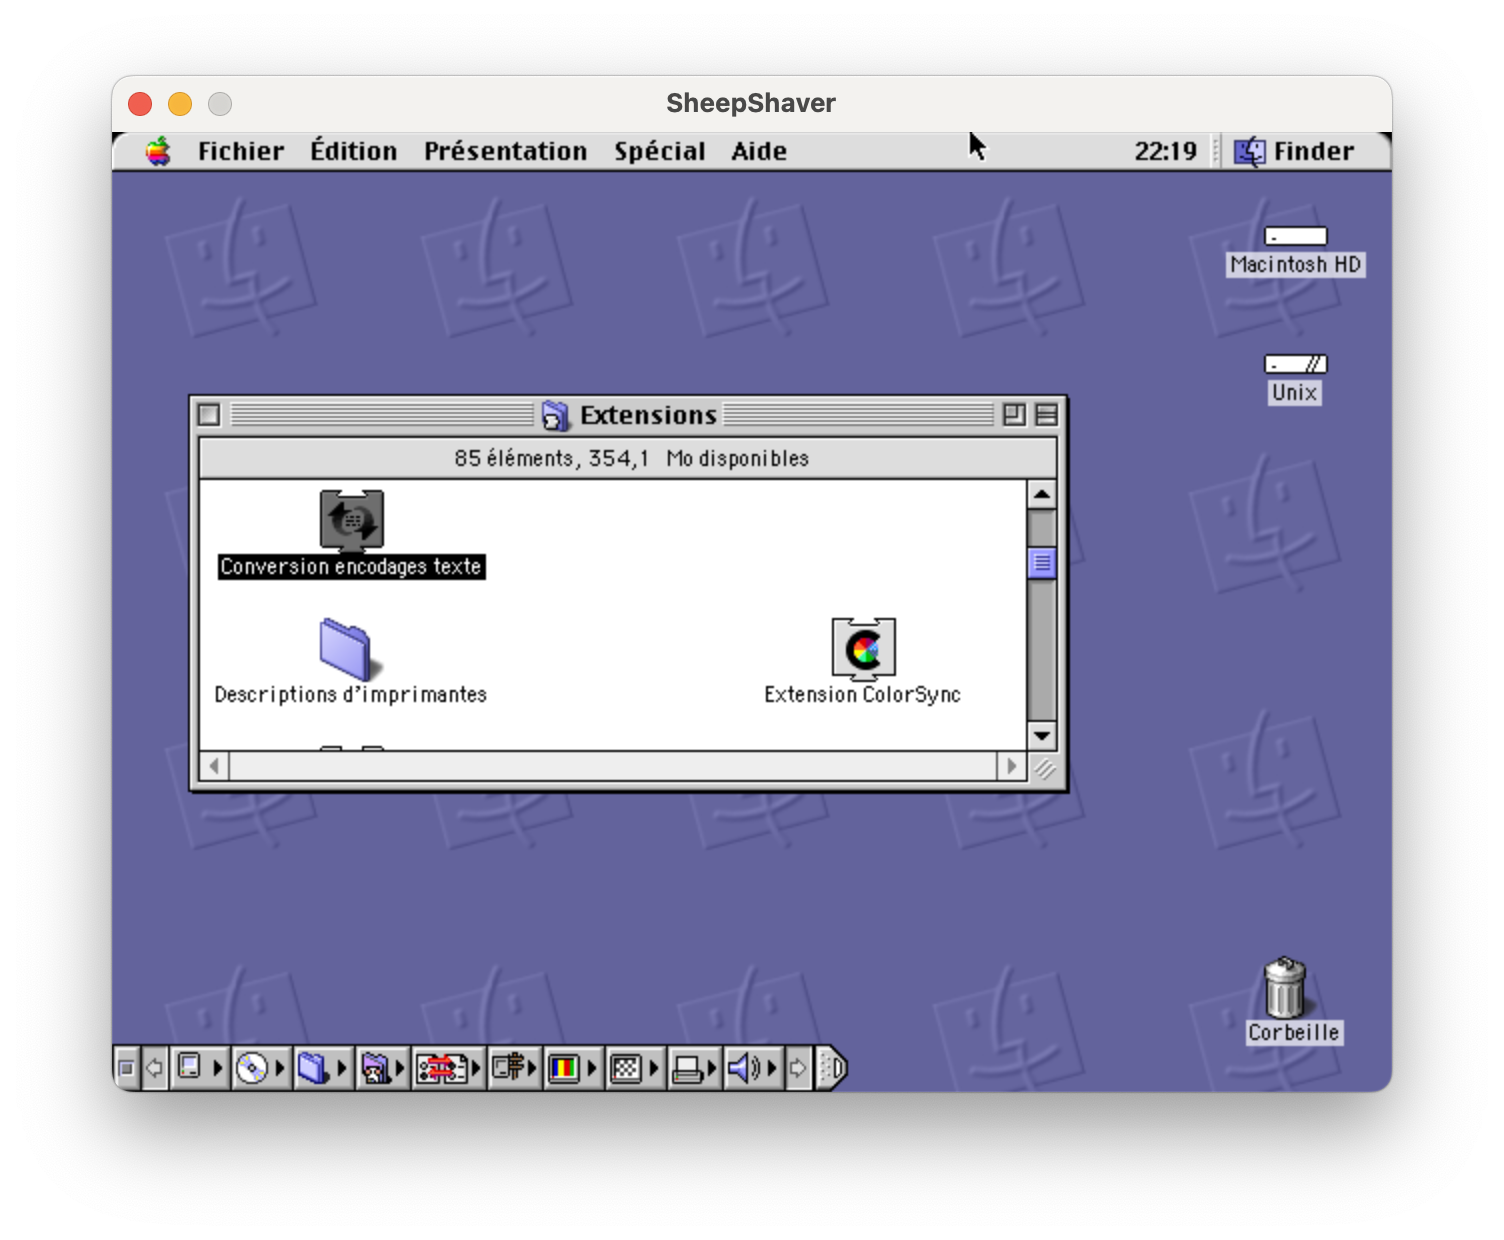
A screen capture of Mac OS 8., showing the desktop and the Extensions folder.

For those who have never seen it, this is what classic Mac OS looked like. It’s not that different from modern Mac OS (now spelled macOS): you have a title bar at the top, showing the menus for the currently focused application and a clock, the desktop with the hard drive and some icons, the Trash at the bottom right corner of the screen (part of the desktop)… There is no Dock, instead you can put often-used applications in the Apple menu, and the menu in the top right is used to switch between running applications. The icon bar at the bottom left is called the Control Strip and provides access to commonly-used system settings like volume control (same thing as the icons on the right side of the menu bar in modern macOS).

Unlike Mac OS X, classic Mac OS is not based on Unix and organizes its files very differently:

  • There is no root volume (/); instead each volume is its own root, in a way.
  • The system disk (called here Macintosh HD but can have any name) has a folder called “System Folder” (Dossier Système in the French version) which contains most of the files needed for the system to function. Applications and user files can be put wherever on the disk (although in later versions of Mac OS it was standard practice to put applications in an Applications folders at the root of the disk).
  • The System Folder contains various system files, most notably the System file (which hold most system code and resources) and the Finder (which is the same thing as the Finder in current Mac OS). It also contains folders, like Preferences (Préférences, which holds settings files for the system and other applications) and Extensions.
  • The Extensions folder contains files that are loaded at system startup and can extend the system in various ways (like to provide support for additional hardware, additional APIs for applications to use, or system customization).

The above capture shows the Extensions folder and the Conversion encodages texte (Text Encoding Converter) extension. From what I can tell, this extension provides APIs to convert between text encodings. At this time, Unicode was relatively new, and OSes manipulated text using various incompatible encodings (in Europe, Mac OS used MacRoman and Windows used CP-1252).

Now, I’m going to drag this extension to the desktop, which will effectively disable it, and reboot. Since this is an extension, not a critical system file, the system should work fine without it. After all, pressing Shift at startup disables all extensions (so you can recover from a crashing extension), so disabling one of them should be fine, right?
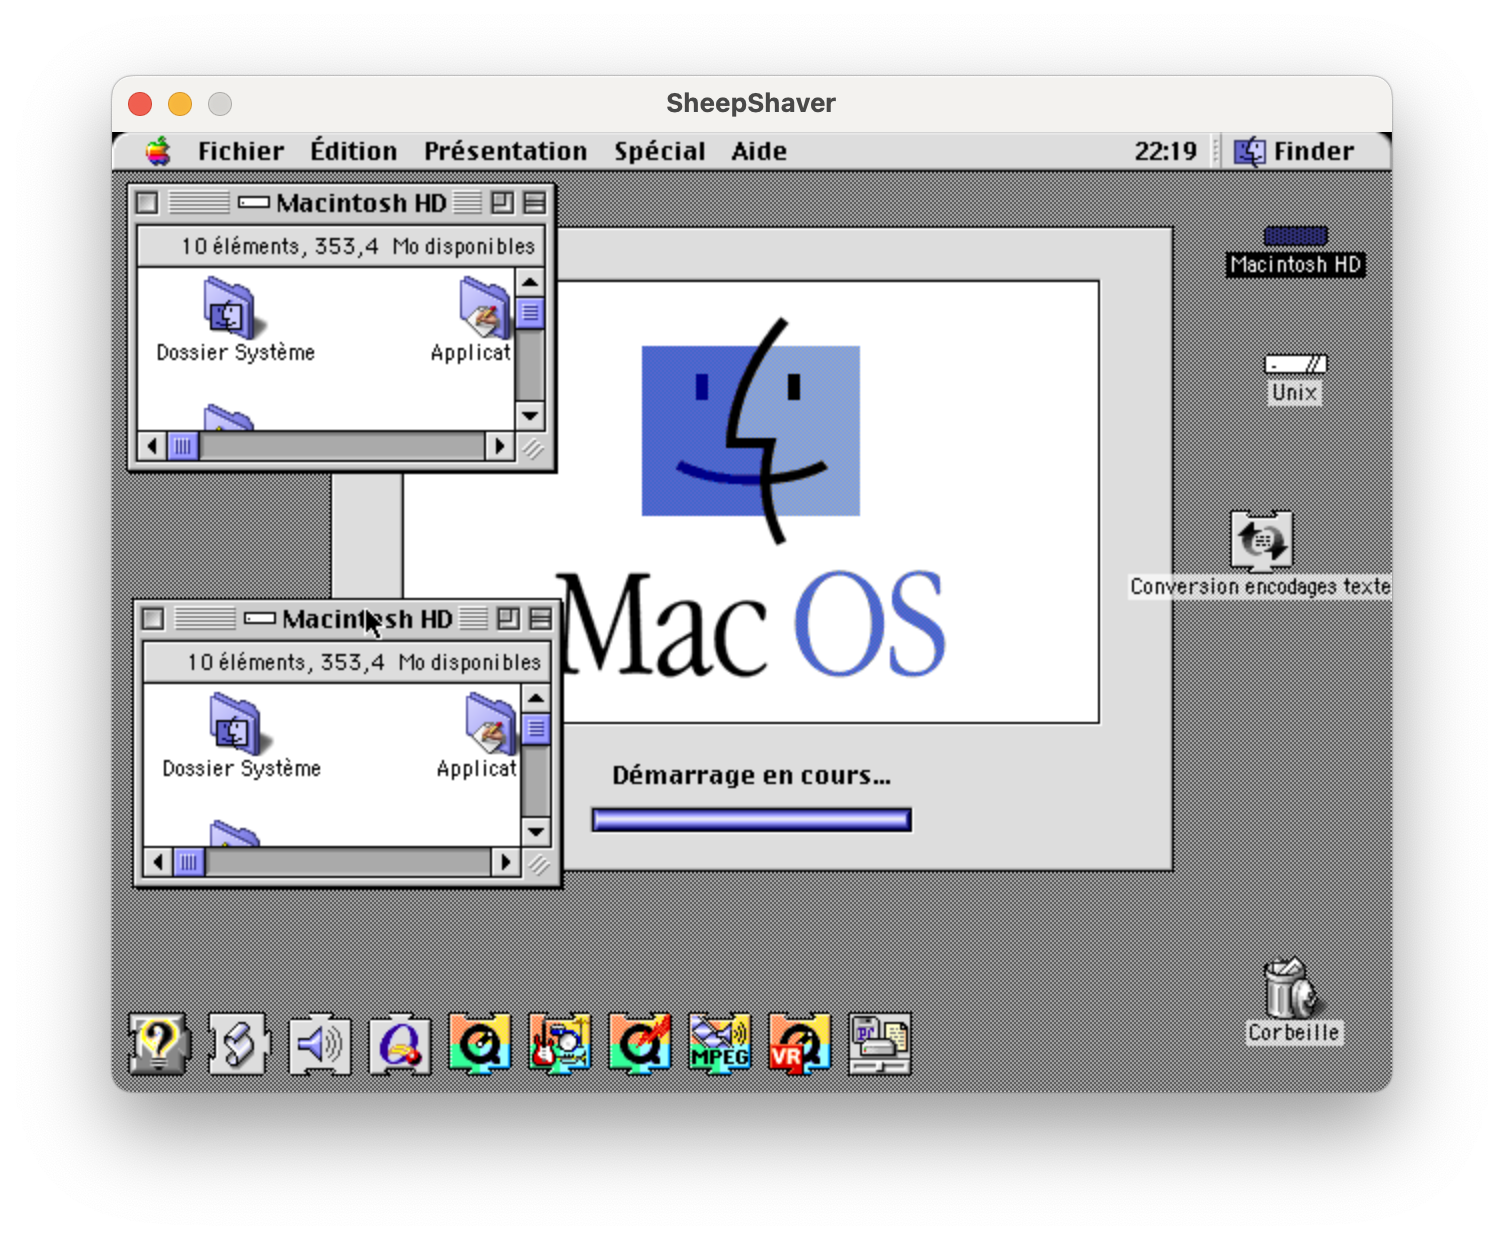
The same Mac OS desktop, but the background is grey, there is a window in the background with a Mac OS logo and a progress bar, a Finder window showing the contents of the Macintosh HD disk, opened twice, and a row of icons on the bottom left.

… what.

You may notice several things:

  • The desktop background is grey, there is a large “Mac OS” window with a progress bar, and a row of icons on the bottom left of the screen. What you’re seeing is the Mac OS boot screen.
  • The “Macintosh HD” window seems to be opened twice. The classic Mac OS Finder does not allow that; what actually happened is that I opened the window and then dragged it to a different location.

What seem to be happening is that the system is failing to paint the background image. The boot screen and the phantom Finder window are just remnants of video memory that should have been replaced with the background, but weren’t.

Another thing: the Control Strip is not displayed. And the Trash icon indicates that there is something in it, although it was empty before rebooting. What is there?
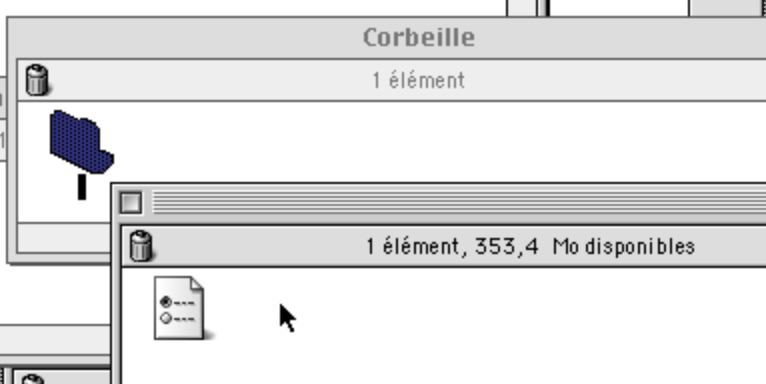
A Finder window showing the content of the Trash (named Corbeille in French): a single folder with no name. A second window shows the contents of the unnamed folder, a single file with no name.

That’s a folder, with an empty name, containing a file (looking like a preference file), also with an empty name. Empty names are not a thing on classic Mac OS; you can’t create a file named “.txt” and hide the extension, since there is no way to hide extensions in the first place (file extensions were not really used by Mac OS at that time).

So this is very weird and smells like a filesystem corruption. There is also an unnamed file in the System Folder, and an unnamed folder in the Extensions folder:
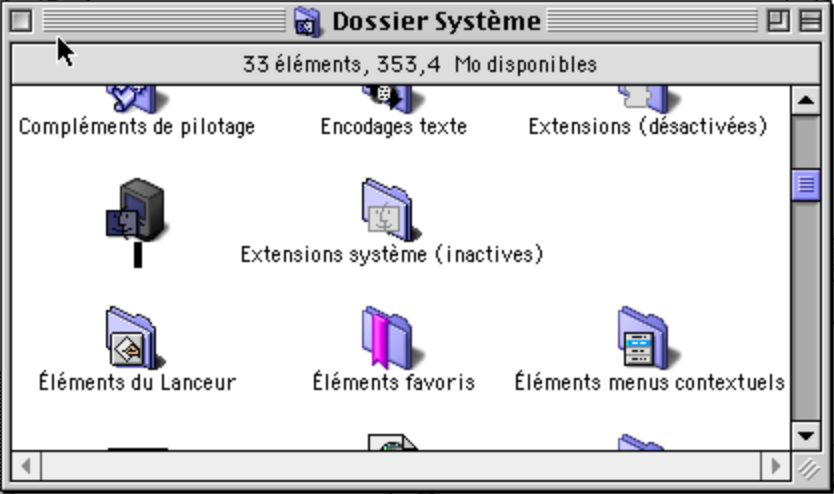
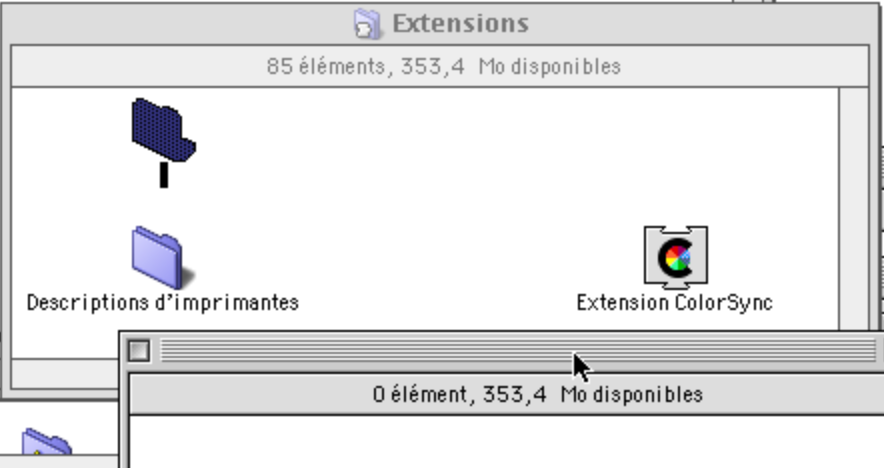
A Finder window showing the contents of the System Folder; the selected file is unnamed and has the same icon as other system files.

A Finder window showing the contents of the Extensions folder; the selected folder is unnamed. It is opened, showing that it is empty.

Okay, this is starting to look too much like a creepypasta. Let’s put the extension back in its place and reboot. That will fix things, right? Well, it fixes the desktop background and the Control Strip, but the unnamed files are still there.

Maybe we can drop all these files into the Trash and empty it. Well, doing this in SheepShaver crashes the emulator. I’m tempted to believe that on a real Mac, it would crash either the Finder or the entire system. (I’ve checked that dragging other files and folders work fine.)

Let’s try to drop the files into a regular folder, instead of the Trash. I’m sure this is going to go well.
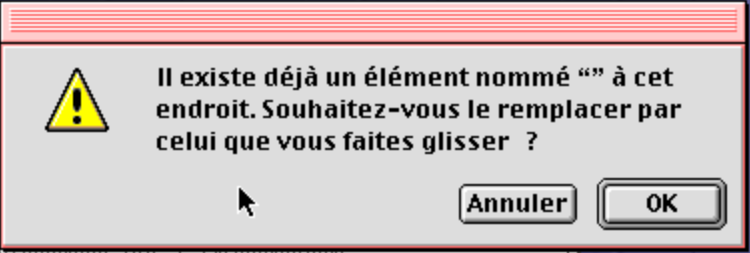
A screen capture of an confirmation message, saying « Il existe déjà un élément nommé “” à cet endroit. Souhaitez-vous le remplacer par celui que vous faites glisser ? »

It says that the destination folder already contains an item with no name, that is going to be replaced. This is not going to end well, but let’s continue anyway.
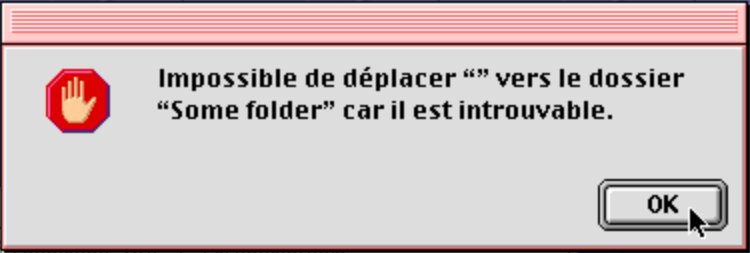
A screen capture of an error message, saying « Impossible de déplacer “” vers le dossier “Some folder” car il est introuvable. »

The move failed because it cannot find the destination folder. Clicking OK reveals that the destination folder has indeed disappeared, and its contents with it. Oops.

Maybe we can at least get rid of the folder and the file in the Trash by emptying it?
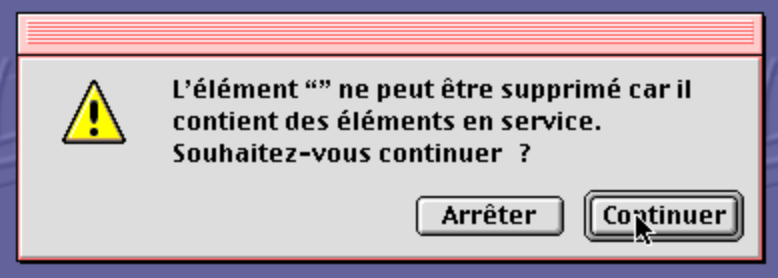
A screen capture of an error message, saying « L'élément "" ne peut être supprimé car il contient des éléments en service. Souhaitez-vous continuer ? »

The message says that an item with no name cannot be deleted because it contains items “in use”. This usually means that an application has opened the file. I’m not sure that’s true, but that will prevent the Finder from deleting the file.

What about fixing the empty names, by renaming the files? Attempting to rename the files by clicking on their names or selecting them and pressing Return fails: nothing happens. Opening their Information window does not help: the normally editable filename field is not editable there.
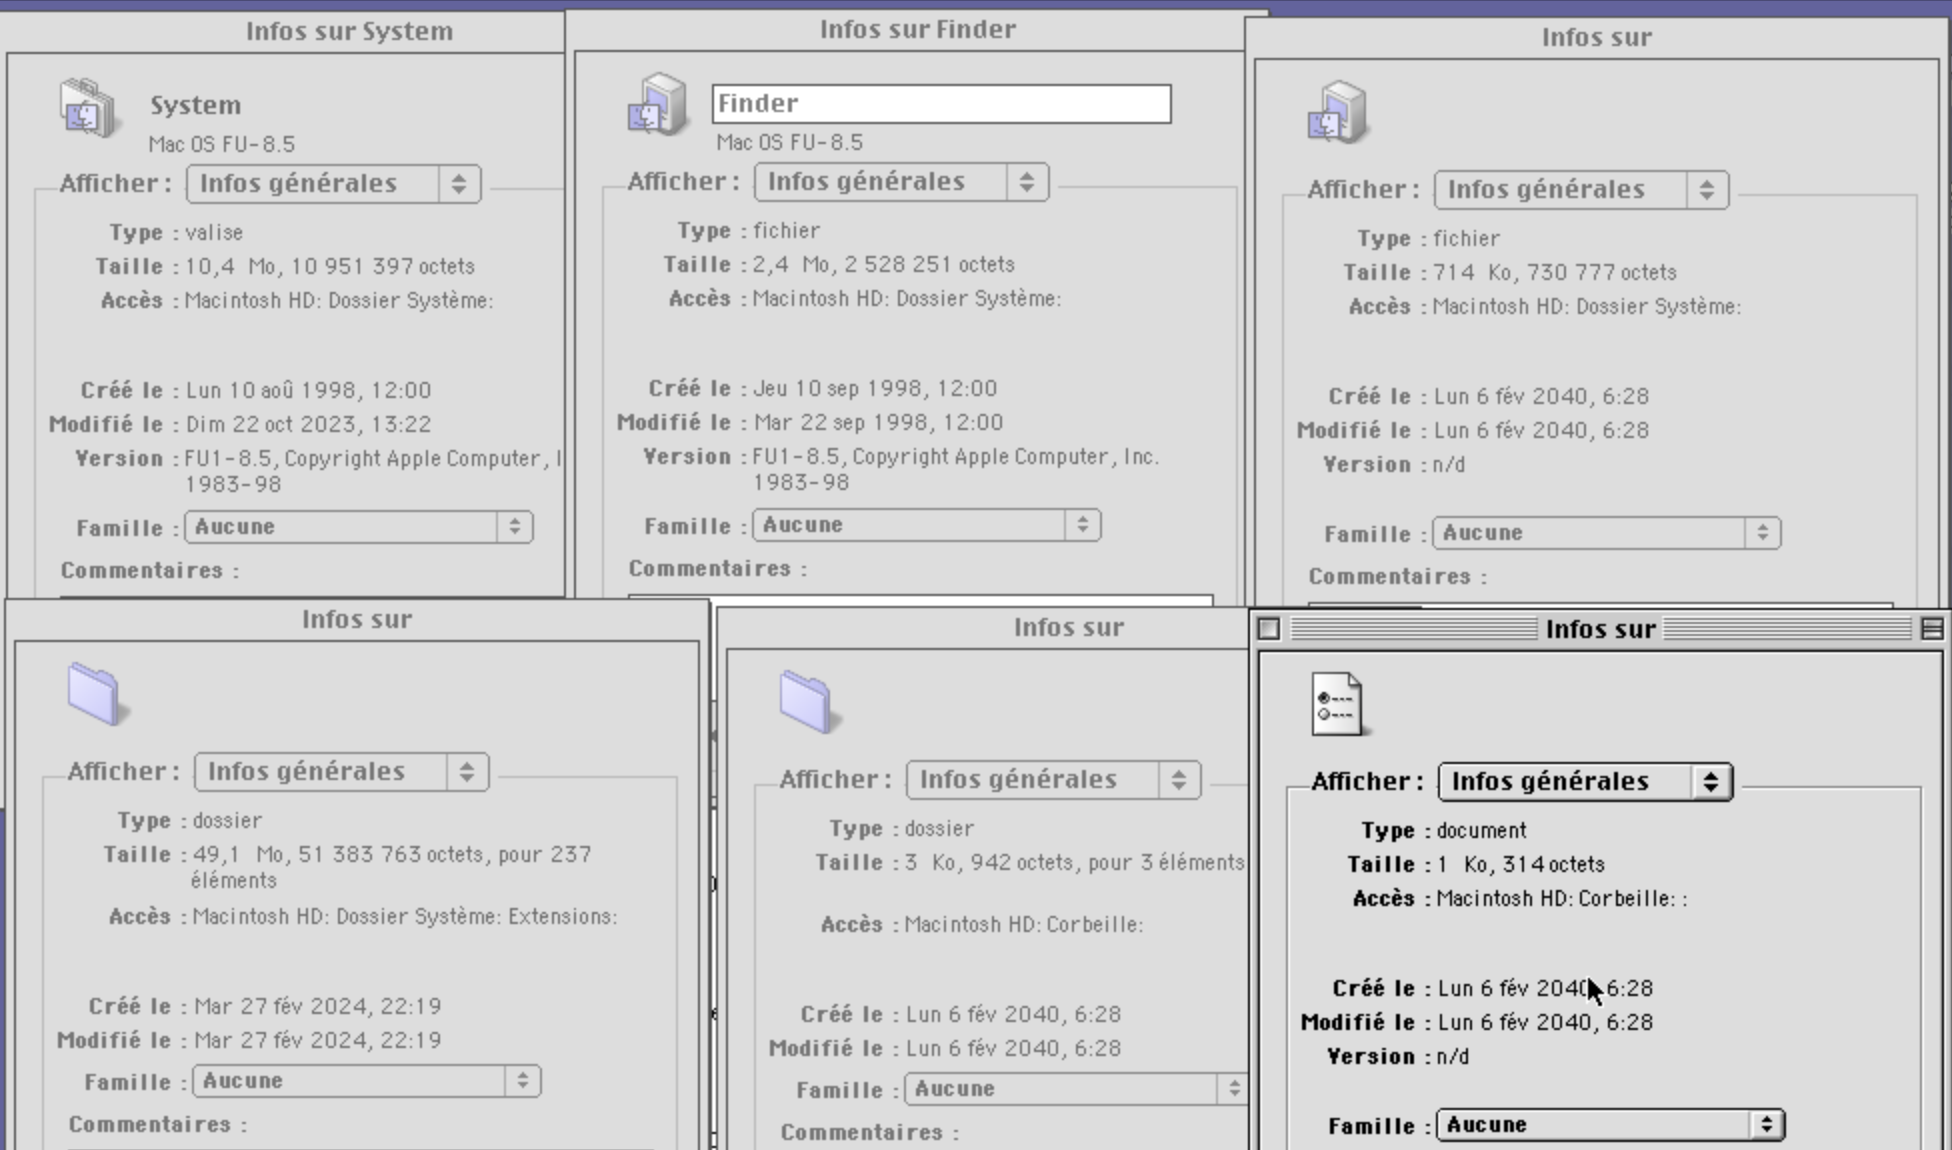
Multiple Finder info windows, for the System file, the Finder file, and the unnamed files and folders. Only the info box for the Finder shows an editable field for the filename.

Since this looks like filesystem corruption, let’s run the built-in filesystem checker (Disk First Aid, S.O.S Disque). And…
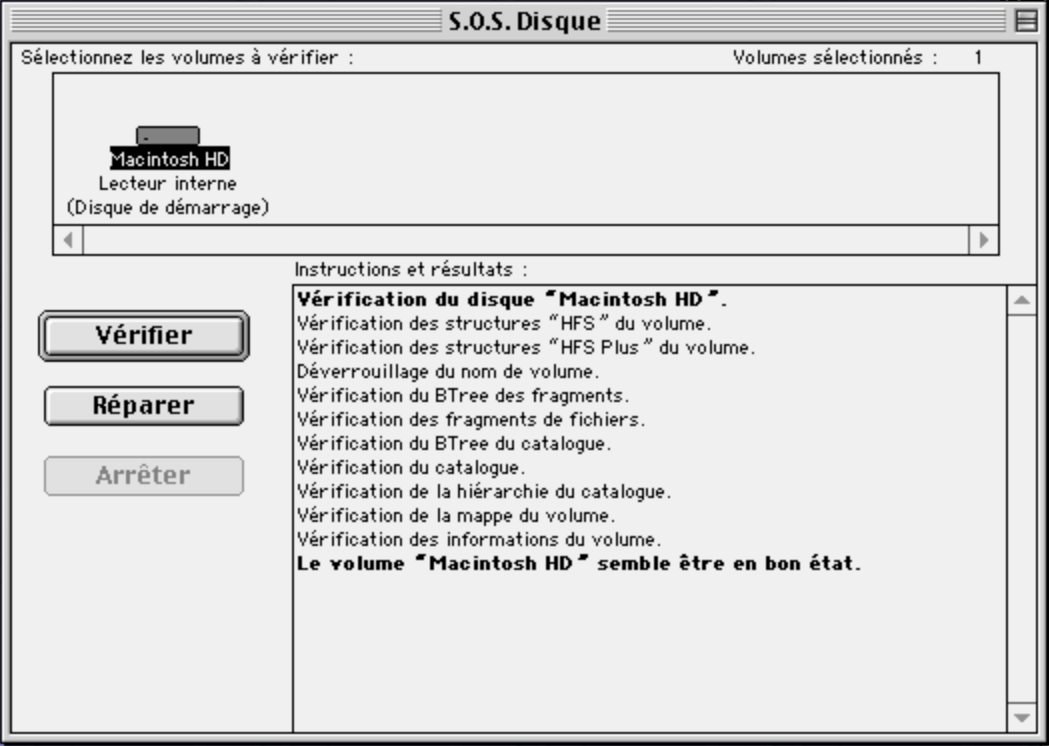
The Disk First Aid window, after a scan of the startup disk, showing that no errors are detected.

It finds nothing!

(I’ve also tried Norton Disk Doctor, but it hangs at startup, probably because of an issue with the emulator. Apparently, on a real Mac, it would find a weird error on the filesystem but fail to correct it.)

Okay, all of this is very weird, but you know what’s weirder? How specific this bug is. It only happens if the following conditions are met:

  • Mac OS version strictly higher than 8.1 (actually Mac OS 8.1 also does weird things if the extension is removed but does not create nameless files and folders) and strictly lower than 9.0. (so basically Mac OS 8.5, 8.5.1 and 8.6, unless I’m missing something)
  • Mac OS is installed on a volume using the HFS+ (Mac OS Extended) filesystem. If it’s installed on an HFS (Mac OS Standard) filesystem, the bug does not occur.
  • A localized version of Mac OS is used. It happens with the French version of Mac OS (and probably with some other localized versions) but not with the US version.

So what is going on? How can removing an extension create weird glitches and corrupt the file system in a way that is not detectable by some disk checkers? In the next post, I’ll do some filesystem inspection do try do determine what’s gone wrong. We’ll learn some things about HFS+ along the way.

How to reset Sidekiq failed tasks counter for Docker Mastodon

My Mastodon instance runs inside a Docker container, with its companion Sidekiq process. When I installed it, I messed up the network configuration, so the email sending tasks failed multiple times. After fixing the issue, I noticed that the Sidekiq control panel still read “Failed tasks: 38” and I really wanted to set this to zero (so I could more easily spot an issue in the future).

I found some info on StackOverflow, but it took some tinkering to make it work in my case (Mastodon-specific sidekiq instance running in a Docker container).

The first step was to open a shell in the context of the Docker container running Mastodon (note: I use podman, but you can substitute docker it that’s what you’re using):

$ podman exec -ti mastodon /bin/bash
root@c24be7da02be:/# irb
irb(main):001> require 'sidekiq/api'
<internal:/usr/lib/ruby/3.3.0/rubygems/core_ext/kernel_require.rb>:136:in
    `require': cannot load such file -- sidekiq/api (LoadError)

Dang. Apparently, the sidekiq API is not accessible from the main Ruby process. I don’t know much about Ruby, but I guess the modules paths are set by environment variables, so I could just takes the one set by the sidekiq process…

root@c24be7da02be:/# ps -ef | grep '[s]idekiq'
root        41     1  0 Nov07 ?        00:00:00 s6-supervise svc-sidekiq
abc        712    41  0 Nov08 ?        00:30:09 sidekiq 6.5.12 www [0 of 5 busy]

Okay, so sidekiq is PID 712. Since it’s running as user abc (UID 1000 according to the id command), let’s close this shell and open a new one using this user (and set HOME so bash does not complain):

$ podman exec -ti --user 1000 -e HOME=/tmp  mastodon /bin/bash
abc@c24be7da02be:/$

Now we can run irb with all the environment variables set by PID 712:
(Note: the following command will not work if any of the environment variables contain spaces; this is not the case here, fortunately)

abc@c24be7da02be:/$ env $(tr '\0' ' ' < /proc/712/environ) irb
/app/www/vendor/bundle/ruby/3.3.0/gems/irb-1.14.1/lib/irb/history.rb:51:in
    `stat': Permission denied @ rb_file_s_stat - /root/.irb_history
    (Errno::EACCES)

So close yet so far. After looking into it, it appears that despite running as user abc, process 712 has HOME=/root in its environment variables, so irb looks for its history file there. (I’m a bit surprised that “not being able to read the history file” is a fatal error for irb, by the way)

So let’s override HOME again:

abc@c24be7da02be:/$ env $(tr '\0' ' ' < /proc/712/environ) HOME=/tmp irb
irb(main):001> 

Finally! Let’s import the module and run the command now:

irb(main):001> require 'sidekiq/api'
=> true
irb(main):002> Sidekiq::Stats.new.reset('failed')
/app/www/vendor/bundle/ruby/3.3.0/gems/redis-4.8.1/lib/redis/client.rb:398:in
    `rescue in establish_connection': Error connecting to Redis on
    127.0.0.1:6379 (Errno::ECONNREFUSED) (Redis::CannotConnectError)

Okay, the Sidekiq API is trying to connect to the Redis databaselocalhost, but Redis actually runs on another Docker container (creatively named mast_redis in my case). I guess that when Mastodon starts sidekiq, it provides it with the Redis address in some way, and we need to emulate that.

After looking in lib/sidekiq.rb, I found a comment explaining how to configure the connection, so I tried it:

irb(main):001> require 'sidekiq/api'
=> true
irb(main):002* Sidekiq.configure_client do |config|
irb(main):003*   config.redis = { size: 1, url: 'redis://mast_redis:6379/0' }
irb(main):004> end
=> {:size=>1, :url=>"redis://mast_redis:6379/0"}
irb(main):005> Sidekiq::Stats.new.reset('failed')
=> "OK"

It worked! I now have zero failed sidekiq tasks. Let’s hope they add a reset button later…

So I finally made a blog

I’m not much of a poster, but I did some posts on Cohost over the years and I enjoyed it! I wanted to keep them online after the shutdown and do more in the future (I have some drafts ready).
I decided to use the autost blog engine, as it’s compatible with Cohost posts and doesn’t require too much tinkering on my Web server.
I’ll only do long posts here; see my Mastodon for the shitposts.

Python footgun: __getattr__

Python classes can implement a special method __getattr__ that is called during attribute access if an attribute cannot be found “normally”. This can be useful to provide fallback values if an attribute is not defined:

class DefaultAttr:
    def __getattr__(self, key):
        try:
            return self.DEFAULT_VALS[key]
        except KeyError:
            raise AttributeError(f"{self.__class__.__name__!r} object "
                f"has no attribute {key!r}") from None

class Sample(DefaultAttr):
    DEFAULT_VALS = {'x': 42}

s = Sample()
print(s.x)  # 42
s.x = 25
print(s.x)  # 25
print(s.y)  # AttributeError: 'Sample' object has no attribute 'y'

Sample objects behave like normal objects, except that if a missing attribute is accessed that is present in the DEFAULT_VALS class dictionary, the default value is returned instead. If the attribute is present on the object, __getattr__is not called and the code proceeds normally.

Note that if DEFAULT_VALS does not provide a default values, __getattr__ raises an AttributeError which mimics the normal AttributeError raised by Python if the `getattr is not defined.

So all of this is fine, right? Well…

class Sample2(DefaultAttr):
    DEFAULT_VALS = {'x': 42}

    @staticmethod
    def cur_time():
        return datetime.daettime.now()

    @property
    def prop1(self):
        return 123

    @property
    def prop2(self):
        return self.cur_time()

print(Sample2().prop1)  # 123
print(Sample2().prop2)  # AttributeError: 'Sample2' object 
                        # has no attribute 'prop2' ??

What is going on here? prop2 is a property, same as prop1, they are defined on the class so why do we get an AttributeError when calling it? Well, the documentation doesn’t exactly says that __getattr__ is called when the attribute is not found 1, it says that it’s called when accessing the attribute fails with an AttributeError. And AttributeError can come from many places…

The issue is that when .prop2 is accessed on a Sample2 object, the prop2 method is called. This method calls cur_time, and cur_time raises an AttributeError because of a typo (“daettime”). Since accessing that property raised an AttributeError, Python calls __getattr__, which doesn’t find prop2 in the default values dictionary and raises its own version of AttributeError.

So this results in a confusing error message (which the version of Python I’m using “helpfully” improves by adding “Did you mean: 'prop1'?” at the end when displaying it), and the original AttributeError is lost with its traceback.

After stumbling onto this, I found this issue about this subject, but this is mostly a non-useful discussion about wether this is a bug or a feature request.

I personally think confusing error messages are bad, especially when they cause the loss of useful debug information.

I’ve found two ways to improve the situation. The first one is to not raise an AttributeError when wanting “default behavior”, but call object.__getattribute__ instead:

class DefaultAttr:
    def __getattr__(self, key):
        try:
            return self.DEFAULT_VALS[key]
        except KeyError:
            return object.__getattribute__(self, key)

With this code, the following happens:

  1. The code accesses .prop2, which raises an AttributeError
  2. Python turns around and calls __getattr__
  3. __getattr__ wants to perform default behavior so it calls object.__getattribute__
  4. This results in .prop2 being accessed again, which again raises an AttributeError
  5. Since the access is done by the lower-level __getattribute__ function, the object __getattr__ is ignored
  6. The exception from the property is correctly thrown to the caller, with full traceback

The obvious disadvantage of this method is that the property is called twice if it fails with an AttributeError. I don’t think it’s an issue because 1) property getters should not have side effects, 2) if your property getter has side effects, it should hopefully not have side effects when raising an exception, and 3) you should rarely catch AttributeError and let the program quickly die if it’s raised anyway.

Another method is to use gasp __getattribute__:

class DefaultAttr:
    def __getattribute__(self, key):
        try:
            return super().__getattribute__(key)
        except AttributeError as err:
            try:
                return self.DEFAULT_VALS[key]
            except KeyError:
                raise err

With this, we basically emulate what Python does when accessing a property (with the super().__getattribute__(key) call), but instead of immediately throwing away any AttributeError that occurs, we store it and re-raise it if no default value is available. This has the advantage of calling the property only once even if it fails, but it requires the use of __getattribute__ which is called for every attribute access on the object. That means that if you mess up, you will end up with it being called recursively until your program dies on a stack overflow. It probably makes every property access on the object a little bit slower, too.

My conclusion is that while Python is a great programming language, some parts of its API are sub-optimal and cause issues2, and this is one of it. I think the best way to solve this in a backwards compatible matter would be to add a constant to the language, maybe called AttributeNotImplemented (to be similar with the NotImplemented return value). __getattr__ could return this value when it wants “default processing” to occur (i.e. let the original AttributeError exception be propagated).

It is overkill to add a constant just for this? Maybe, but I think it would be justified in that case.


  1. it used to say that in Python 2, but this was apparently changed for Python 3

  2. My personal list of Python footguns that I struggle with regularly: strings are iterable, bytes objects can be silently converted to strings, and f-strings require that f"" prefix.

Little Python trick: Type-safe object extensions

I’m currently playing with type annotation and static type checking in Python (using mypy) and came across a somewhat interesting problem: How to allow extending an object in a type-safe manner?

Suppose that you have an object where extension modules can add attributes: for instance, the Django Web framework’s sessions middleware adds a session attribute on each incoming request object so that views can use the session.

This approach does not work with static type checking: For the the type checker, a Request object has a fixed number of attributes, and session is not one of them. The session attribute cannot be hard-coded into the request object because anybody can write a new middleware that will also have this problem.

A solution can be to add a generic dictionary to the Request object so that extensions can add their data. The values of this dictionary cannot be bound to a single type, since each extension will need to add its own type of data, so it will be typed Any:

class Request:
	ext_values: dict[str, Any]

Now the session middleware can do request.ext_values['session'] = … and the view code can use it without issues. However, for the type checker, request.ext_values['session'] is an untyped (Any) object, which means that it cannot do any typing verification on the object. Typos like request.ext_values['session'].usre will not be detected.

The view code can also cast the session object from Any to its actual type, but that’s not very pretty, and could be error-prone.

So how can we get the type checker to understand “If I access this dictionary with this key, it will always return an object of this exact type”? By using the type as a dictionary key!

T = TypeVar('T')

class Request:
    _ext_values: dict[type, Any] = {}

    def get_ext(self, val_type: Type[T]) -> T:
        return cast(T, self._ext_values[val_type])

    def set_ext(self, value: object) -> None:
        self._ext_values[type(value)] = value

This may require a little explanation if you are not familiar with Python’s metaprogramming capabilities. If you write class A:, the expression A is itself an object (usually an instance of the type class), and this object work like most objects. Most notably for our case, we can compare classes (they are all different from each other) and they have a hash value, so they can be used as dictionary keys:

class A:
 pass

class B:
 pass

d = {
 A: 'a'
}

d[B] = 'b' # d now contains 2 values
print(d[A], d[B]) # prints 'a', 'b'

So now let’s see what happen on the Request object:

# Session middleware code
session = Session(…)
request.set_ext(session)

set_ext calls type() on the provided session object, which returns the class object (here, Session), and uses it as a key to store the session object. Now we have _ext_values == {Session: session}.

In the view code:

user = request.get_ext(Session).user

Here, the Session class is passed to get_ext. Since it exists in the dictionary, get_ext returns the stored session object, and user code can retrieve the user object inside it. The important parts are the type annotations: the -> T means “I return an object of generic type T” and the : Type[T] means “I take an argument which is a class object, and this class object is T”

This means that when the type checker sees the request.get_ext(Session) code, it know that this expression returns an instance of Session, and can check that it actually has a user attribute. Type safety achieved!

One cool thing is that despite the cast done on object coming out of the dictionary, this is type safe: as long as nobody messes up with _ext_values directly, get_ext will always return an instance of the type passed in, or a KeyError. Other extensions cannot accidentally erase a value set by another extension (as long as they use distinct types).

Note that it is pretty simple to extend this scheme to multiple values per class, still in a type-safe manner: add a string key, and use a (type, string key) tuple as the dictionary key:

class HTTPRequest:
    _ext_values: dict[tuple[type, str], Any] = {}

    def get_ext(self, val_type: Type[T], key: str) -> T:
        return cast(T, self._ext_values[(val_type, key)])

    def set_ext(self, key: str, value: object) -> None:
        self._ext_values[(type(value), key)] = value

Now the session code does request.set_ext('session', Session(...)) and the view code does request.get_ext(Session, 'session'). The use of both the type and the string key to index values in the dictionary means that type safety is preserved: If another extension does `request.set_ext('session', AnotherObject(...)), the dictionary will contain:

{
	(Session, 'session'): <the session object>,
	(AnotherObject, 'session'): <the other object>,
}

and request.get_ext(Session, 'session') will still return the session object.

Note that I didn’t invent this technique; it’s rarely used in the wild, because it requires a programming language where types are first-class objects (so we can use them as dictionary keys) and that perform static type checking. I’m pretty sure I’ve seen it used in Swift (which has both characteristics).

Walls, Floors, Ceilings, and Game Development

I watched the live-streaming of pannenkoek2012’s latest video, SM64’s Invisible Walls Explained Once and for All.

It was a pretty fun and instructive video, and the chat’s reactions were very funny too1. But of course, there were some negative comments, and I’m pretty sure not all of them are satire, since, unfortunately, yelling at game developpers is a pretty common Internet activity.

So let’s get the record straight (I doubt people will actually read this but this helps getting it out of my system):

  • Computers are not like humans, things that developpers did that seem “more complicated” than an alternative (for instance, having ceilings that extend infinitely upwards instead of having a limited range) are actually easier to do (in the ceiling example, it means that the CPU has to do one comparison to detect that Mario is in the ceiling instead of two). I’ve also seen similar reactions to hardware design: “Why did they made RAM appear at two address space locations and then ask you not to touch one of the location?” Because it saved them a chip.
  • Computers are not like humans, they have no eyeballs, they cannot “see” that a floor is higher that another floor. Iterating over all the floors ordered by height until you find the first one lower than Mario is a reasonable thing to do. (Okay, there may be more sophisticated algorithms that are more efficient, but the point is that the computer has to run algorithms to determine things, because that’s the only thing computers can do)
  • It it said that a game receives 100 (1000?) times more QA in the first hour of its release than during all of its development; and it makes sense given when you compare the number of players with the number of QA testers. But of course, many gamers do not realize that.
  • QA testers have more trouble seeing issues with invisible things (the invisible walls, the impossible coin, non-solid walls, misaligned loading zones in other games, etc) because they are invisible. Sure, fans have written debug tools that help find them (and speedrunners sometimes found them by accident), but the original developpers did not have time for that. Bugs regarding visible things have a higher change to be detected and fixed.
  • Pannen’s video is almost 4 hours long and is about the collision detection code of SM 64. And not even all about it! It’s probably not even 1% of the game code. So yeah, it’s imperfect, corners were cut, but developpers had many, many other things to make work in order to release the game. (And personally, as a non-game programmer, I find collision detection to be pretty much magic, especially in 3D. I have absolutely no idea how you check if a point is over a triangle, which is the basis of everything Pannen has talked about in his video)
  • It didn’t happen too much but some comparisons were made with a recent game, where a commentator said that it was OK for SM64 to have “bugs” but not the more other game. Guess what, it’s actually the same thing: Relatively small team of developpers, big ambition, extremely tight, non-extensible timeframe (for reasons outside of the developper’s control). There will be cut corners, and you may not appreciate them, but other people will enjoy the game anyway because of the other things that were made right and make the game enjoyable.

And… that’s it! Don’t forget to watch Pannen’s video (if you have 3.75 free hours), and support him if you can.

Also, to speedrunners: when talking about a glitch that helps you beat the game faster, please don’t talk about it like it’s the worst thing it the world, and especially don’t say “I have no idea why they did something this stupid”. Try to explain it in the context of game development.


  1. Special mention to people that noticed that Pannen was repeating “So let’s look at it from the side and let’s look at it from above” and started posting it in all caps in the chat every time it was said again, it actually made me laugh out loud

PSA: Python SSL wrap_socket has a bad default behavior for servers

The SSLContext.wrap_socket method has an optional do_handshake_on_connect argument. When True (the default), it performs the TLS handshake (where the client and server agree on a protocol, exchange certificates, etc) directly after the socket is connected.
This is fine for client sockets (as long as you are prepared to handle SSL errors when calling socket.connect — they are a subclass of OSError so that is not too difficult). But on server sockets, the handshake is performed on the newly connected socket returned by socket.accept, before it’s actually returned.
This causes two problems:

  • If a client fails the TLS handshake, accept will throw a SSLError. You can catch it, but you will not know the address of the client that caused the error, because this address is normally returned by accept and accept threw instead of returning.
  • If a client connects and then proceeds to do nothing, the SSL library will wait indefinitely for the handshake to proceed. Your code stays blocked in accept and you cannot handle more clients while this happens! You may think that you could set a timeout on the listening socket, but this timeout is not transferred to the connected socket.

Once you know that, the solution is simple:

  • Pass do_handshake_on_connect=False when wrapping the socket
  • Once accept returns a socket, set a timeout on it (or set it to non-blocking and use asynchronous I/O), then call do_handshake. If that fails with a SSLError (or a socket error…), you can properly log it since accept returned the address of the client.

TIL that /bin/sh -c has subtle portability issues

I tried to use a Python auto-reloader program and found that it ran correctly under macOS but was failing to correctly restart the monitored program under Linux (Debian, to be specific).

After some investigation, I found that it used subprocess.Popen with shell=True; this basically runs /bin/sh -c <specified command>, which itself runs the command. We initially get the following process hierarchy:

[PID X] python
 \_ [PID Y] /bin/sh -c <specified command>

But then things start to differ depending on shell used. If /bin/sh is zsh (default under macOS) or bash, the shell directly replaces itself with the command being run (using exec), and we get:

[PID X] python
 \_ [PID Y] <specified command>

But if /bin/sh is dash (default under Debian), it runs the command in a subprocess and waits for it to exit. This gives:

[PID X] python
 \_ [PID Y] /bin/sh -c <specified command>
     \_ [PID Z] <specified command>

And this is were things break if if the Python program calls kill() to kill the started process. In both cases, it will send a KILL signal to PID Y; under macOS, this will kill the process, but under Debian it will kill the intermediate shell and leave the program running!

Moral of the story:

  • Portability is hard
  • This is yet another reason to not use shell=True in Python programs!

Configuration management with git on Debian

Ah, configuration files. The place there’s a guaranteed opportunity of edit conflict (between the package author, and you), and no really satisfying solution.

My understanding is that, on RPM-based distributions, if a configuration file is modified by the user, it stops being updated. Permanently. On Debian and derivatives, it asks you a question with no good answer: “Do you want to lose your configuration changes, or get a non-working software?”.

With most packages, it’s annoying, but not too bad; you can often put your configuration changes in an override file, that will be untouched by package upgrades and it should keep working. But I happen to use Dovecot, an IMAP server which has a complicated configuration (in many files), which cannot really be configured in overrides, and which changes pretty often.

I decided to tackle the problem once and for all.


The trick

I want to put the Dovecot configuration in a Git repository, with two branches: one for the default distribution configuration, and one for my customized configuration. When the Dovecot package is upgraded, it will put the new configuration files on the “distribution” branch. I can them commit the changes, then merge (or rebase) them on my customized branches. That way, I have more control over the process.

The problem is that I need to convince the installer to write the files on a Git branch. Fortunately, Git has a worktree feature that multiple branches to be checked out simultaneously in different directories. I can have my customized branch in /etc/dovecot and my distribution branch in /etc/dovecot.dist. That way, Dovecot will read the customized configuration fine, but I still need to tell the installer to write the new files in /etc/dovecot.dist and not /etc/dovecot.

Fortunately, Debian has a tool to do just that: dpkg-divert. It’s basically a way to tell the package system, “If a package want to install a file at /some/location/x, install it at /some/location/y instead”. This is called a diversion, and is mainly used by packages to avoid file conflicts with other packages. You can run dpkg-divert --list to see the list of active diversions on your system.

A small wrinkle is that Dovecot does not use the package system to install its configuration files; it uses a tool called ucf (“Update Configuration Files”), which makes configuration management a bit easier by allowing three-way merges during updates. This means that the files in /etc/ are created by ucf, not dpkg. Fortunately, ucf understands and respects diversions, so the procedure should still work.

So now we’re all set. Here is what I did:

Clean state configuration

Since my Dovecot configuration is pretty old (with files last modified in 2011!), I wanted to start clean with a new configuration. I looked at Dovecot post-install script and saw that it stores its default configuration in /usr/share/dovecot/ so I copied the files from there:

# mv /etc/dovecot /etc/dovecot.bak
# mkdir /etc/dovecot
# cp -r /usr/share/dovecot/conf.d /usr/share/dovecot/dovecot.conf /usr/share/dovecot/dovecot-dict-auth.conf.ext /usr/share/dovecot/dovecot-dict-sql.conf.ext /usr/share/dovecot/dovecot-sql.conf.ext /etc/dovecot/
# mkdir -m700 /etc/dovecot/private/
# ln -s /var/lib/dehydrated/certs/xxx/privkey.pem /etc/dovecot/private/dovecot.key 
# ln -s /var/lib/dehydrated/certs/xxx/fullchain.pem /etc/dovecot/private/dovecot.pem

The default Dovecot configuration loads its certificate and key from /etc/dovecot/private/dovecot.{pem,key}, which are symlinks to a fake certificate. Instead of changing the configuration, I decided to just make the symlinks point to my real certificate (a Let’s Encrypt certificate managed by dehydrated). The post-install script doesn’t touch those symlinks once they are created, so that should be fine.

Creating the Git repository

Since I’m editing Dovecot’s configuration as root, I needed to configure Git as root by running git config --global --edit and set a username/email.

# cd /etc/dovecot
# git init -b main .
Initialized empty Git repository in /etc/dovecot/.git/
# echo '/private/' > .gitignore
# git add .
# git commit -m 'Initial configuration from distro'
[main (root-commit) 56c5310] Initial configuration from distro
 30 files changed, 2218 insertions(+)
…
# git branch distro
# git worktree add ../dovecot.dist distro
Preparing worktree (checking out 'distro')
HEAD is now at 56c5310 Initial configuration from distro
# git branch
+ distro
* main
# cd /etc/dovecot.dist
# git branch
* distro
+ main

So we have the main branch on /etc/dovecot/ and the distro branch on /etc/dovecot.dist, as expected.

Configuration

I can then modify the configuration in /etc/dovecot/ and verify that it works. Once it’s done, I add a diversion for all files that I modified. For instance, I modified the file conf.d/10-auth.conf, so I run:

# dpkg-divert --local --no-rename --divert /etc/dovecot.dist/conf.d/10-auth.conf --add /etc/dovecot/conf.d/10-auth.conf
Adding 'local diversion of /etc/dovecot/conf.d/10-auth.conf to /etc/dovecot.dist/conf.d/10-auth.conf'

I do the same for all modified files, then I commit them into Git.

Upgrade

Now, package upgrades should go smoothly, since the package manager/ucf only sees unmodified files. Since not all files were diverted (maybe I should do it…), it’s possible that some files were modified/added on the customized branch. I move all these changes to the distro branch and cancel them on the main branch.
Then, I commit all changes on the distro branch, then merge/rebase it into the customized branch. Done!

Caveats

One issue to be aware of: file permissions. Don’t forget that the .git directory contains the full history of all your configuration files, and is by default world-readable. Even if you restrict access to one configuration file (because it contains database passwords for instance), people can still read the file contents by fetching it from the Git commit data (by running git show HEAD:thefile, for instance) 1. To avoid issues, you should make sure that the .git repository is not world-readable.


  1. This issue with accessible .git folders is not limited to local access — If you deploy a website that is hosted on a Git repository, make sure that the .git folder is not accessible from the web! If it is, people may be able to extract the raw files from your webserver, including any secrets that were committed to the repository.

Filesystem exploration: the almost-FAT12 floppy disk

My parents have a (pretty old at that point) Yamaha Clavinova digital piano, with a floppy drive that can be used to record or play MIDI files.

It came with a floppy disk named “Disk Orchestra Collection” that contains various sample songs. I randomly decided to image it. It copied fine without errors, yay! But I couldn’t mount it: “No mountable filesystems”.

I was pretty sure this was some sort of “copy protection”, and not an issue with the imaging process. Given the age of the system, the protection was not going to be very complex, though. Let’s try to get it to mount!

Note: For accessibility purposes, I’ve put a summary of all hexdumps in this post in figcaption tags. I don’t know if it’s the best way to do it and am open to suggestions.


Looking through the image with hexdump revealed some interesting things:

00000e00  4d 55 53 49 43 20 20 20  44 49 52 20 00 00 00 00  |MUSIC   DIR ....|
00000e10  00 00 00 00 00 00 29 78  94 1e 02 00 e0 0b 00 00  |......)x........|
00000e20  4e 41 4d 45 20 20 20 20  4d 44 41 27 00 00 00 00  |NAME    MDA'....|
00000e30  00 00 00 00 00 00 2a 78  94 1e 05 00 e0 0b 00 00  |......*x........|
At offset e00, an ASCII string "MUSIC DIR"; at e20, "NAME MDA"

This looks like a directory listing on a FAT filesystem! On FAT, filenames are limited to a 8 characters names and 3 characters extension, all ASCII uppercase.
The filesystem stores the 8 characters of the name and the 3 characters of the extension one after the other, padding them with spaces if they are shorter than that. For instance, the name "A.X" will be stored as "A<7 spaces>X<2 spaces>". So here, we can see two names "MUSIC.DIR" and "NAME.MDA". We can also see that the start of each filename is 0x20 bytes after the previous one, and FAT directory entries happen to be 0x20 bytes long.

Since this is a floppy disk, it is probably FAT12 formatted (FAT16 and FAT32 are for larger drives). After reading through some Wikipedia pages, here’s what I understand about this filesystem: (note: I may have got some details wrong)

  • The first sector of the disk (sector 0) is the “boot sector”. It contains information about the layout of the filesystem, and some code that is executed to boot the computer. It always contains boot code even if the disk does not contain an OS; in that case the boot code is a small program that writes “Non-system disk or disk error, press any key to reboot” (or a variant of it) on the screen. (Different disk format tools put different messages so you may have seen different messages, or even localized ones, when leaving a floppy in your computer’s disk drive)
  • The boot sector can be followed by a number of “reserved sectors”. I guess that may be useful for some OSs to put additional boot code.
  • After the boot and reserved sectors comes the File Allocation Table (FAT). All the disk space that is used to store file data (and subdirectory contents) is divided into “clusters” (which are a certain number of sectors long). The FAT contains a series of values that indicate the state of each cluster:
    • The cluster is free space (not used)
    • The cluster is damaged and should not be used
    • The cluster is “reserved”. I guess this is used to indicate that the filesystem driver should not mess with this cluster, for whatever reason.
    • The cluster contains data for a file. The value in the FAT either indicates the index of the next cluster that contains data for this file, or a special value that indicates that it’s the last cluster that holds data for this file.
  • There can be multiple copy of the FAT, for redundancy purposes.
  • After the FATs comes the “root directory”, that list the files and directories at the root of the drive. On FAT, directories are basically special files that contain a list of filenames, with attributes and the start cluster of each one. The “root directory” is special because it’s not part of the storage data, so it’s not divided into clusters; it has a fixed size. Want to store more files at the root of the drive? Sorry, you’ll have to reformat it.
  • Finally, the file clusters comes afterwards, until the end of the disk.

Let’s see how a file is read on FAT. First, you need to locate it. Let’s say the file path is “\X\Y\Z.TXT”

  1. The first name in the path is “X”, so we look for an entry named “X<7 spaces><3 spaces>” in the root directory. This gives us the start cluster of directory \X contents.
  2. From the start cluster, we can read directory \X contents (the same way we would read a file; see below) and find subdirectory Y. This gives us the start cluster of directory \X\Y contents.
  3. Read directory \X\Y contents until we find entry “Z<7 spaces>TXT”. This gives us the start cluster of this file.

The directory entries also gives us other information, such as the file (or directory) creation date/time, last modification date/time, file size, and attributes. The attributes indicates if what we’ve found is a file, a directory, or some other weird thing (like long file names).

Now that we known the start cluster of the file, we can read the value in the FAT corresponding to that cluster, and get the next file cluster. We follow this linked list to the end and hopefully get the list of all clusters that store this file’s data, so we can read it.

Okay, so why does our mystery disk refuses to be mounted? Let’s look at sector 0:

00000000  00 00 00 00 00 00 00 00  00 00 00 00 00 00 00 00  |................|
*
00000200
hexdump showing that sector 0 is filled with zeroes

It’s empty! That’s why the disk cannot be mounted. The information about the
filesystem layout is missing.

So let’s try re-creating sector 0; maybe it will be sufficient to mount the
the disk.

The two first cluster values of the FAT are special. From what I understand, cluster 0 value is always 0xFFx with x = 0 or between 8 and F inclusive, and cluster 1 value is always 0xFFF. On FAT12, these are 12-bit values, so each value is stored into 1.5 bytes in little-endian order (which is a bit weird because of the half-byte).

That means we can expect a FAT12 FAT to start with “Fx FF FF”. At sector 1, we can see:

00000200  f9 ff ff 03 40 00 ff 6f  00 07 f0 ff 09 a0 00 0b  |....@..o........|
00000210
hexdump showing bytes f9 ff ff at the start of sector 1, then some other bytes

That’s probably the first FAT. Let’s look a bit further:

00000500  01 22 20 03 42 20 05 62  20 07 82 20 ff 0f 00 00  |." .B .b .. ....|
00000510  00 00 00 00 00 00 00 00  00 00 00 00 00 00 00 00  |................|
*
00000800  f9 ff ff 03 40 00 ff 6f  00 07 f0 ff 09 a0 00 0b  |....@..o........|
00000810
hexdump showing zeroes starting at offset 0x508, then f9 ff ff at offset 0x800, followed by the same bytes that were at offset 0x200

So the second FAT starts at offset 0x800. That means the FAT is 0x600 bytes, or three sectors long. So the second FAT ends at 0xe00, which is exactly the offset of the MUSIC.DIR directory entry, so root the directory is indeed right after the second FAT.

Now we can determine the information we need to put into sector 0 in order to make the disk readable:

Bytes per sector: 512 (standard for a 720K PC floppy disk)
Number of reserved sectors: 1 (sector 0 counts as a reserved sector, and the FAT immediately follows it).
Number of FATs: 2 (as seen above)
Total sector count: 1440 (720KB disk * 1024 bytes per KB / 512 bytes per sector)
Sectors per FAT: 3 (as seen above)
Sectors per track: 9 (standard for a 720K PC floppy disk)
Number of heads: 2 (standard for a 720K PC floppy disk)
Maximum number of root directory entries:
Let’s try to locate the end of the directory. After a long list of filenames
starting at 0xe00, we find:

000015a0  4d 44 52 5f 35 39 20 20  45 56 54 27 00 00 00 00  |MDR_59  EVT'....|
000015b0  00 00 00 00 00 00 0a a9  95 1e fd 01 f4 2c 00 00  |.............,..|
000015c0  00 e5 e5 e5 e5 e5 e5 e5  e5 e5 e5 e5 e5 e5 e5 e5  |................|
hexdump showing a "MDR_59 EVT" entry at offset 0x15a0; the next entry at 0x15c0 starts with 00 then e5 repeated

A directory entry starting with 0x00 indicates the end of the directory. After, there is a bunch of 0xe5 bytes, with a 0x00 every 32 bytes. This ends at offset 0x1c00, where something that looks like file data begins.

So let’s assume the root directory is located between 0xe00 and 0x1c00. This is 3584 bytes, which is 7 sectors or 112 directory entries. Comparing this to other disk images I have, this seems common.

Sectors per cluster:
I’m a bit confused by this value. The disk can store 1426 sectors of cluster
data, and the FAT has 1164 non-zero cluster values, so I assumed that there was
one sector per cluster. This was wrong; I could mount the disk but not read
any files. Other disks that I have seem to all have two sectors per cluster,
so I used this value instead, and it seems to work. Maybe I’m missing something
about the FAT layout.

The other values in sector 0 are not directly linked to the filesystem
structure. I put some reasonable values. I had a bit of trouble with the very
first value on the disk (three-byte “boot jump”); I think this is the location
in memory where execution is started after copying sector 0 to memory. Putting
zero here did not work so I copied a value from another disk image (0x903ceb).

Okay, let’s see what fsck_msdos thinks about our reconstructed sector 0:

% ./regen_sector_zero.py clavinova_disk_orchestra.img clavinova_disk_orchestra_fixed.img
% fsck_msdos -n clavinova_disk_orchestra_fixed.img 
** clavinova_disk_orchestra_fixed.img
** Phase 1 - Preparing FAT
FAT[0] is incorrect (is 0xFF9; should be 0xF01)
Correct? no
** Phase 2 - Checking Directories
** Phase 3 - Checking for Orphan Clusters
62 files, 194 KiB free (194 clusters)

It looks like the FAT cluster 0 value 0xFF9 is weird enough that the filesystem checker does not like it, but the rest of file system seems OK! Let’s mount it:

% hdiutil attach -readonly clavinova_disk_orchestra_fixed.img        
/dev/disk6          	                               	/Volumes/NO NAME
% ls -nT /Volumes/NO\ NAME
total 1038
-rwxrwxrwx  1 501  20  12042 Jun  7 23:29:58 1995 MDR_00.EVT
-rwxrwxrwx  1 501  20  32787 Apr 21 20:59:22 1995 MDR_01.EVT
[…] 
-rwxrwxrwx  1 501  20  11508 Apr 21 21:08:20 1995 MDR_59.EVT
-rwxrwxrwx  1 501  20   3040 Apr 20 15:01:18 1995 MUSIC.DIR
-rwxrwxrwx  1 501  20   3040 Apr 20 15:01:20 1995 NAME.MDA
The disk mounts successfully and show 60 files named MDR_XX.EVT, one file named MUSIC.DIR and another named NAME.MDA. File dates are in 1995

Success! All the files read fine. There are no subdirectories on the disk. It looks like “NAME.MDA” contains the title of the songs on the disk, in a fixed-size format, and “MUSIC.DIR” contains the corresponding filenames “MDR_XX.EVT”. The EVT files probably contain MIDI data in a proprietary format; I could not easily find information about them or a way to convert them.

And that’s it! I had quite a bit of fun exploring this disk image, and it was satisfying to mount it successfully.
In the future, I think I’ll investigate a weird HFS+ corruption bug that affected some specific versions of Mac OS 8.

About me

Hi! I’m VinDuv.
I’m a systems programmer, mainly embedded Linux. I’m also a Mac user. I sometimes tinker with old/weird computer things.
You can find me on Mastodon (mostly programming discussion/shitposting) and Bluesky (mostly cute stuff and French politics).